In partnership with: 
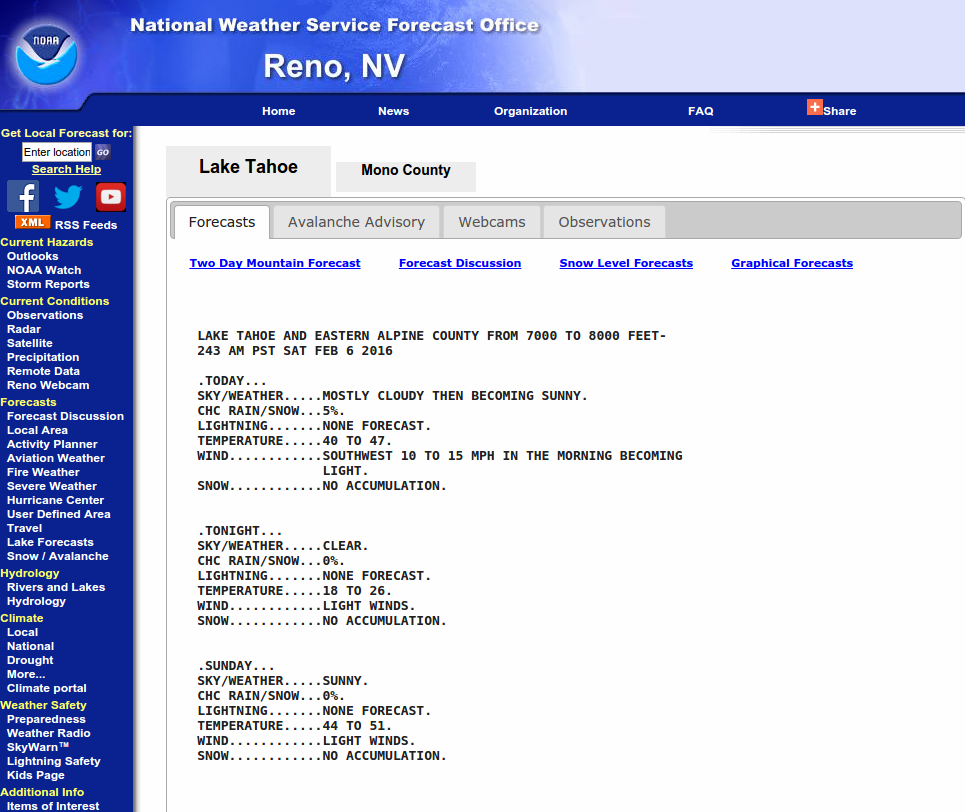
Anticipate conditions by using an avalanche forecast. If one isn’t available, factor a high level of uncertainty into the rest of your day by creating wide safety margins. Either way, anticipate conditions in these three categories:
Weather, snowpack, and avalanches are very closely connected, and can be viewed as building blocks in that order. Previous weather, including storms and whatever happened in between storms, is what built the current snowpack. The current snowpack and the weather that acts upon it determine the avalanche problem.
The SAC forecast, like most others throughout the US, begins with the avalanche problem, then snowpack observations, and finishes with a weather forecast. To casual users of an avalanche forecast, this is the order of importance. Users committed to lifelong learning may want to scroll to the bottom of the forecast and explore the information in the opposite order, to better teach themselves how weather builds the snowpack, and how the two interact to create the avalanche problem.
There are four weather effects that build the seasonal snowpack:

Precipitation can fall as two types; snow or rain. Snow crystals have different shapes and sizes as they fall from the sky, depending on environmental conditions where they are formed. When they land, the different crystals have a short-term influence on how well they bond to each other and to the old snow surface they land on. The differences quickly (from hours to days) lose significance as gravity and additional weather change the original shapes and sizes into new ones.
An important exception to this is a snow type called graupel, which is spherical like tiny hail. Graupel often doesn’t bond well to itself or the old snow surface, and it can retain its shape, size, and bonding properties for slightly longer periods than other new snow types.
Rain is warm relative to the snow it lands on, and the heat can break bonds between the snow grains. The rain can also penetrate the snow and lubricate between deeper grains and/or layers. Once it refreezes, the strong bonds between grains can form large melt/freeze grains and rain crusts. Although rain crusts are relatively strong, weak layers often develop above or below them (see melt/freeze below).
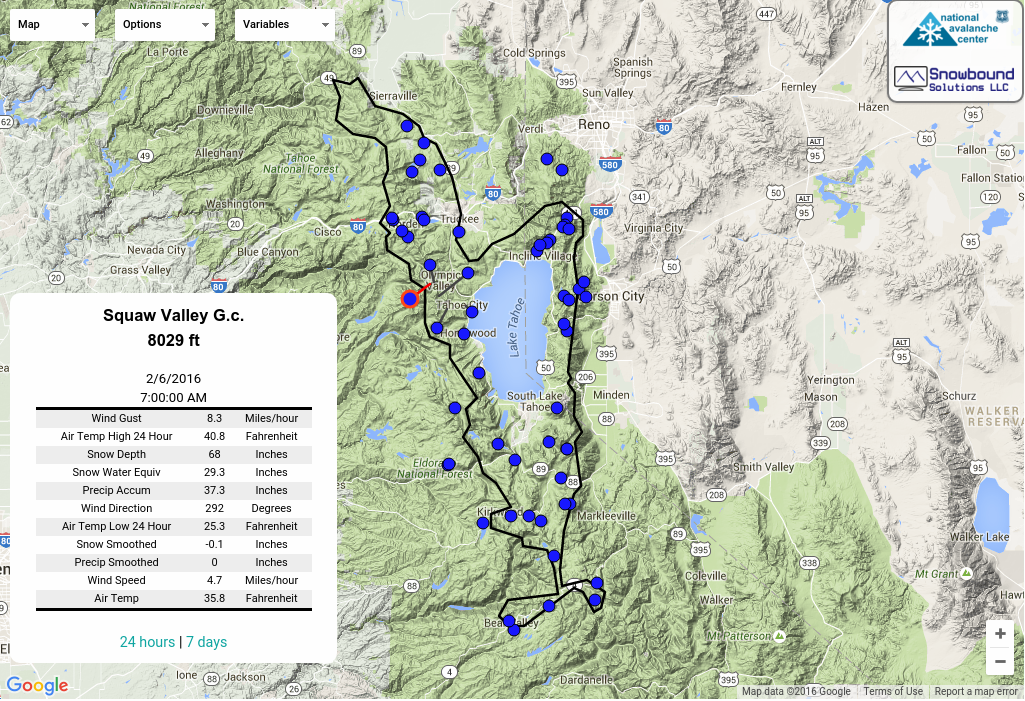
Wind sculpts the snow; both in the air and on the ground, and on different scales; from the individual crystal and grain to the entire landscape. New and old snow alike can be battered by the wind into ever smaller and smaller pieces, until they look and behave more like tiny grains of sand than the original snowflake that fell from the sky. At the larger scale, massive amounts of snow can be moved by the wind, resulting in distribution patterns that vary throughout the landscape. To visualize the patterns, it’s important to keep track of wind speed and direction, and the amount and density of new or old snow that’s available for wind transport.
Moderate winds are the most efficient at moving snow, but the density of snow available for transport is an important variable. Low density snow can be moved by lighter winds, and high density snow needs stronger winds. As the winds get extreme, distrubution patterns become highly irregular and/or the snow travels so far as to effectively be gone.
Wind direction is communicated in reference to its origin, so a wind that comes from the west is a “west wind.” If there’s new snow falling, or snow on the ground available for transport, wind moves snow from windward to leeward. In the west wind example, snow would be moved from west (windward) to east (leeward). This redistribution process creates snowpacks with different thicknesses and layering on windward compared to leeward slopes.
Temperature affects the type of precipitation that falls and continues to influence the snowpack on the ground. Snow is especially sensitive to temperature because winter temperatures are close to water’s "triple point." At 32oF, water can exist as solid, liquid, and gas. In the snowpack, all three phases of water can be present.
The ground in winter is consistently near 32oF, and the early season snow that falls on the ground is often much colder. Not only is this interface right at water’s triple point, but there’s also a big temperature difference between the warm ground and cold snow. Significant changes can occur here. Take note if early season snow falls cold and/or remains exposed to cold air temperatures, versus if it falls warm and/or is quickly buried by additional insulating snow.
Daily swings in temperature from day to night alternately heat and cool the surface snow. Similarly, cold fronts and warm fronts will cause temperature changes within relatively short time periods. These diurnal and frontal changes can result in wildly different temperatures between layers within a few inches of the surface. If layer temperatures are different enough, rapid changes can occur where they meet (see faceting below).
The Sun has a similar effect on the surface snow as air temperatures, but strong sun is not always associated with warm air temperatures, nor a lack of sun with cold air temperatures. And sunlight plays by different enough rules that it needs to be thought of separately from air temperature. Although both heat and light are energy, they are transmitted, absorbed, and reflected differently.
Early in the winter, the sun is only out for a few hours each day, and even at its highest point it remains low in the sky. It affects south-facing slopes, or south aspects, but they need to be steep enough to face the low sun as directly as possible. Less steep slopes tend to reflect the sun’s energy more than absorbing it. Southeast and southwest aspects get some direct sun at the right time of day, but because mornings are generally colder than afternoons, the southeast aspects may warm less than the southwest. Even when it hits the snow at ideal angles, early season sunlight has more atmosphere to pass through before hitting the snow, making it weaker than other times of year.
As the season progresses, the sun stays out longer and gets higher in the sky. Slopes that received indirect sun early in the season receive more direct sunlight, including low angle slopes and even north facing slopes very late in the season. The sunlight also gets filtered through less atmosphere when it’s more directly overhead, and transmits more energy to the snow.
Low density snow absorbs more sunlight and reflects less than high density snow. You can observe this by digging into the snow on a sunny day; removing thin pieces of low density and high density snow, and holding them to the sky to see which allows more light to pass. When on the surface, lower density snow allows some light to pass and become absorbed several inches into the snowpack. Higher density surface snow allows less sunlight to pass. Similarly, dirty snow and other dark objects like rocks, exposed soil, and vegetation all absorb more sunlight energy than clean, reflective snow.
Equally important to where the sun shines, is where it doesn’t. Shaded aspects and low angle sunny slopes early in the season receive little energy from the sun and remain colder than steep sunny slopes. Rapid change can occur if weather events put warm snow onto otherwise cold slopes, cold snow onto warm ground, or any variation of warm and cold next to each other. And overall, just like your refrigerator does for food, cold slopes preserve the layers formed by other weather events. Snowpack layers on cold slopes can remain intact for extended periods – sometimes until the snow melts in spring.
In the simplest terms, big differences between snowpack layers increase avalanche likelihood, and uniformity between the layers reduces it. Look at the seasonal and recent weather history for atypical weather events and patterns that might indicate layers with different characteristics and a potentially unstable snowpack.
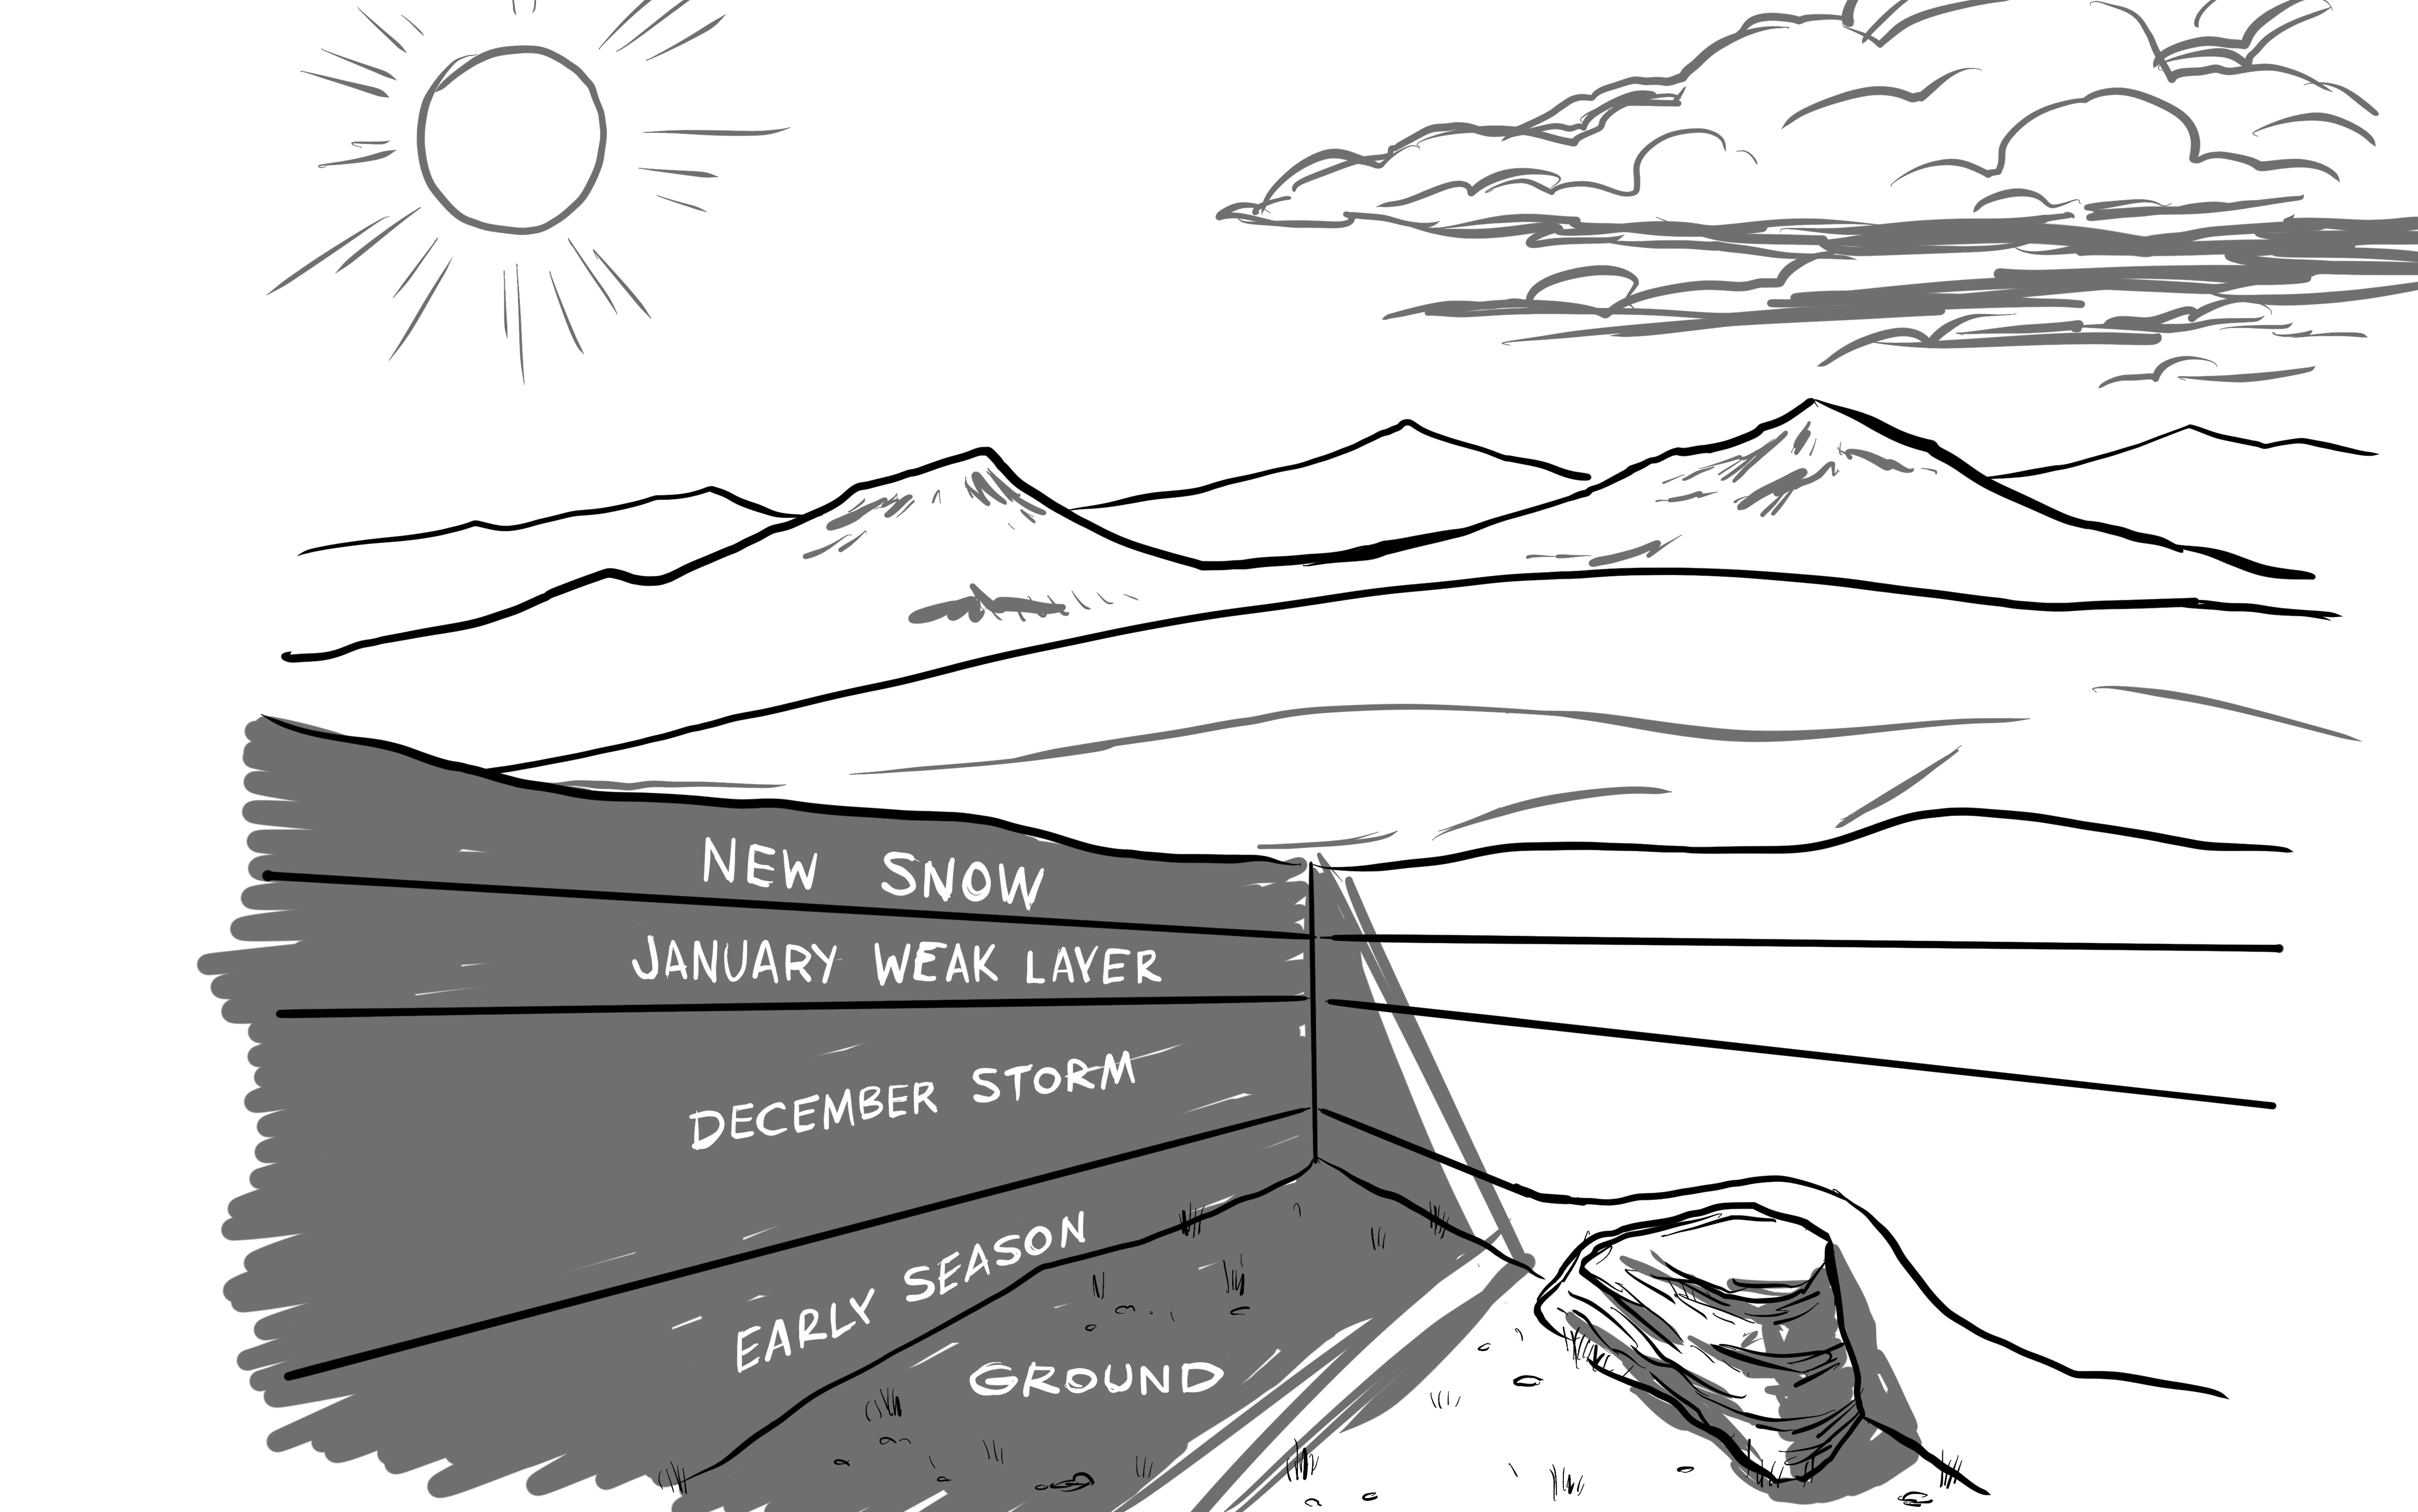
After snow lands on the ground, the snowpack layers - that were already different because of the weather events that formed them - undergo changes. There are four types of change to be aware of:
Settlement is the snow’s gradual decrease in height and increase in density over time due to gravity. Gravity pulls downward on the snow, reducing the amount of air in between snow grains. The effects of settlement are very observable in newer snow at the surface. Older snow below the surface typically reaches an equilibrium and has greatly reduced settlement rates.
Rounding is one of two possible results of "sublimation" in dry snow. Sublimation is the phase change in snow from water ice to water vapor, and back to water ice again - skipping the liquid phase. Water vapor sublimates from the end points of a snow grain, and if a vapor molecule stagnates in stable temperatures and/or is blocked from moving by high density snow, it reattaches itself toward the middle of a grain, ultimately shrinking the size of the grain. The shrinking grains look like rounded puzzle pieces that are so small they can require a magnifying glass or microscope to see. These are called rounds, and they fit together well and create high density and strong layers in the snowpack.
Faceting is the second possible result of sublimation. If relatively warm and cold snow are next to each other, at low enough densities for vapor to move through, the vapor moves from warm areas to cold and attaches to the first solid it hits – typically the end point of another grain. This cumulatively grows the grains. The resulting facets can be distinguished from rounds because they are bigger and more angular. Often a magnifying glass is not required to see individual facets and their angular shapes, and if they make a thick enough layer you can feel them with your hand. Facets feel like sugar and resist bonding if you squeeze them together.
Surface hoar is structurally similar to other facets, but with a different formation process than described above. Surface hoar grows at the surface when a very thin layer of air right above the snow cools to its dewpoint. At its dewpoint, water vapor from the air attaches right to the snow surface or to vegetation and other objects in contact with the layer of cold air. The same process can be replicated by taking a cold beer mug out of your freezer; the frost that forms is because the air that touches the cold mug reaches its dewpoint. Surface hoar grows well during cold, cloudless, and windless conditions and often grow more at night than during the day.
Surface hoar forms feathery structures that have some vertical strength but almost no shear strength. Not every surface hoar event survives its time on the surface, or survives getting buried by subsequent storms to become a layer deeper within the snowpack. Surface hoar is like a house of cards; they require very gentle handling to build upon. But if buried intact, they create a notorious weak layer.
 Surface Hoar
Melt/freeze layers form when water molecules transition between solid and liquid. When rain falls on snow, or warm air temperatures and/or strong sun bring the snow surface up to 32oF, the snow will end up with some liquid water present. Usually in winter this water will stay near the surface and refreeze to form a melt-freeze crust, or percolate and refreeze deeper in the snowpack. Any of these melt-freeze layers are weak when wet but strong when frozen.
However strong the crusts themselves are, because they are relatively warm, facets are likely to grow if there’s cold snow next to them. Expect to find facets if the crusts form at the surface on top of cold, low density snow; or if they are exposed to prolonged cold temperatures near the surface; or if cold, low density snow falls on top of them.
If enough rain falls or enough surface snow melts, the water can percolate deep into the snowpack. While still in liquid form, the water will break existing bonds in the snowpack, making it weaker. If it hits a layer that slows or stops it from percolating downward, water can spread along that layer and act as a lubricant. In springtime in a warm snowpack, the liquid water might not refreeze, and eventually drain through the bottom of the snowpack and lubricate at the ground.
The avalanche "problem" is a holistic way to predict avalanches that includes:

Anticipating the whole problem, instead of just a single component of the problem, better reduces uncertainty and helps you create safety margins specific to the day's conditions.
Avalanche Type is a way to categorize avalanches that display similar characteristics because they result from similar snowpack structures. Different avalanche types behave differently, and deserve different safety margins and group management techniques. Primary avalanche types are Loose Snow and Slab avalanches.
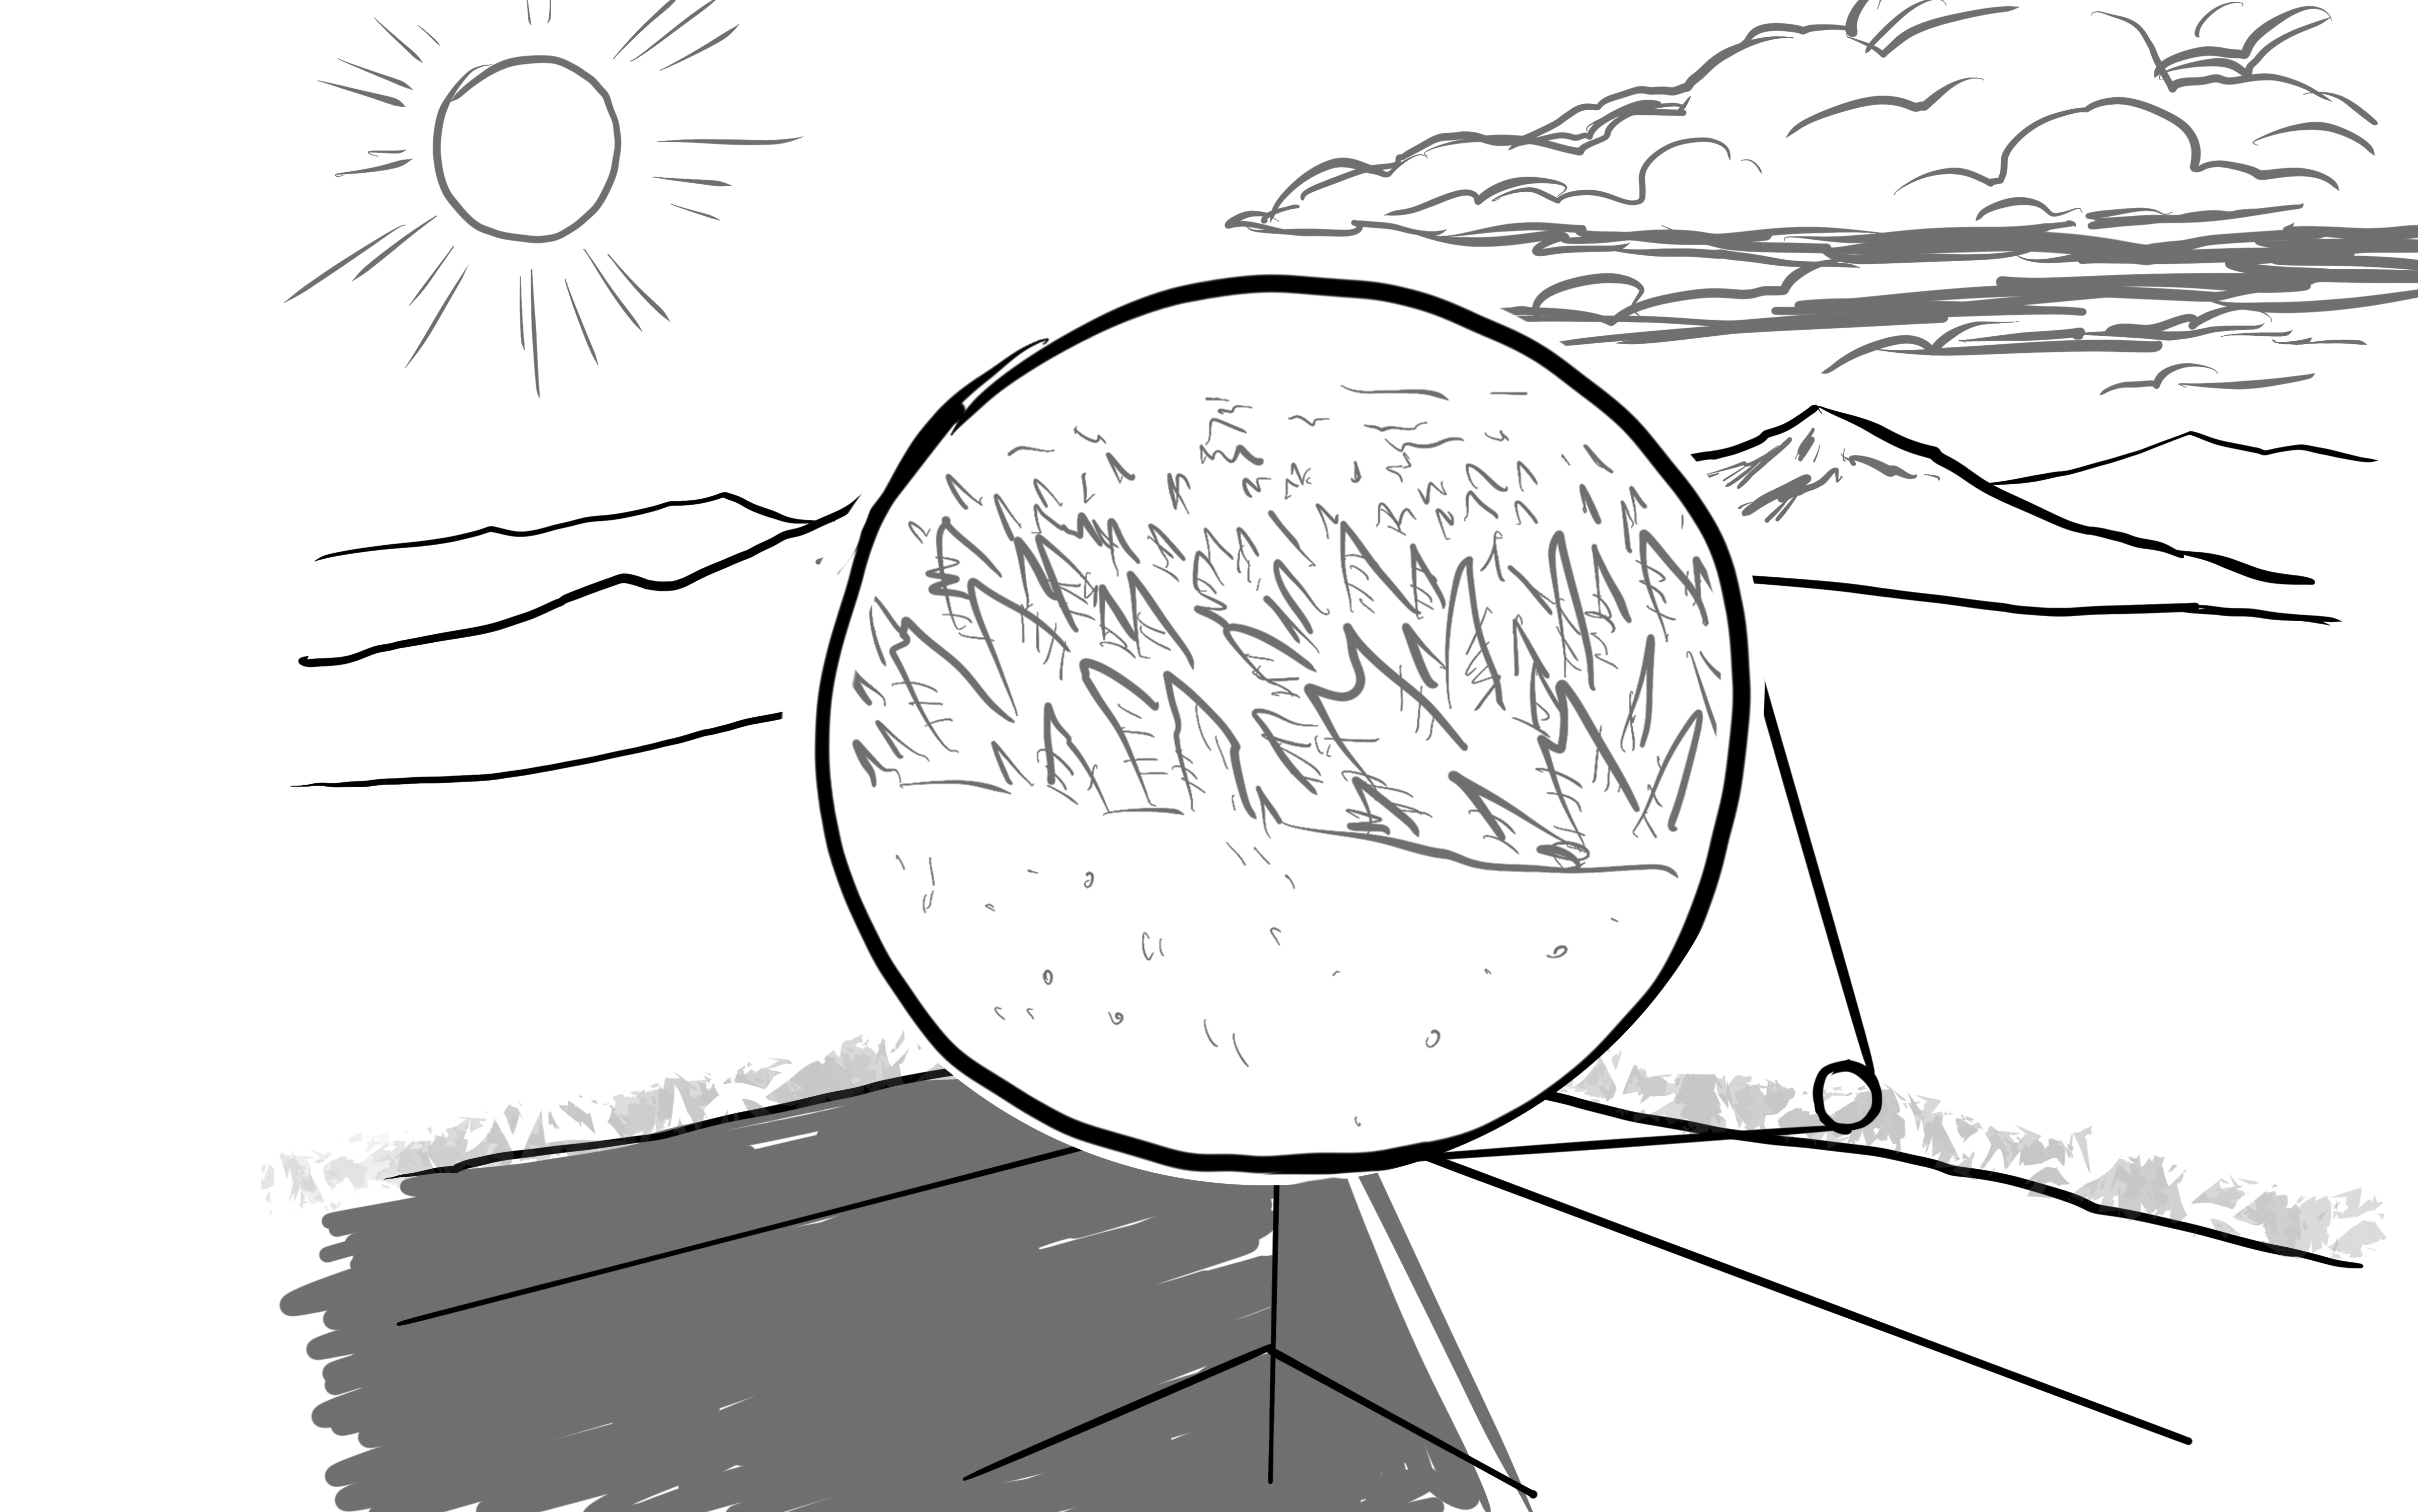
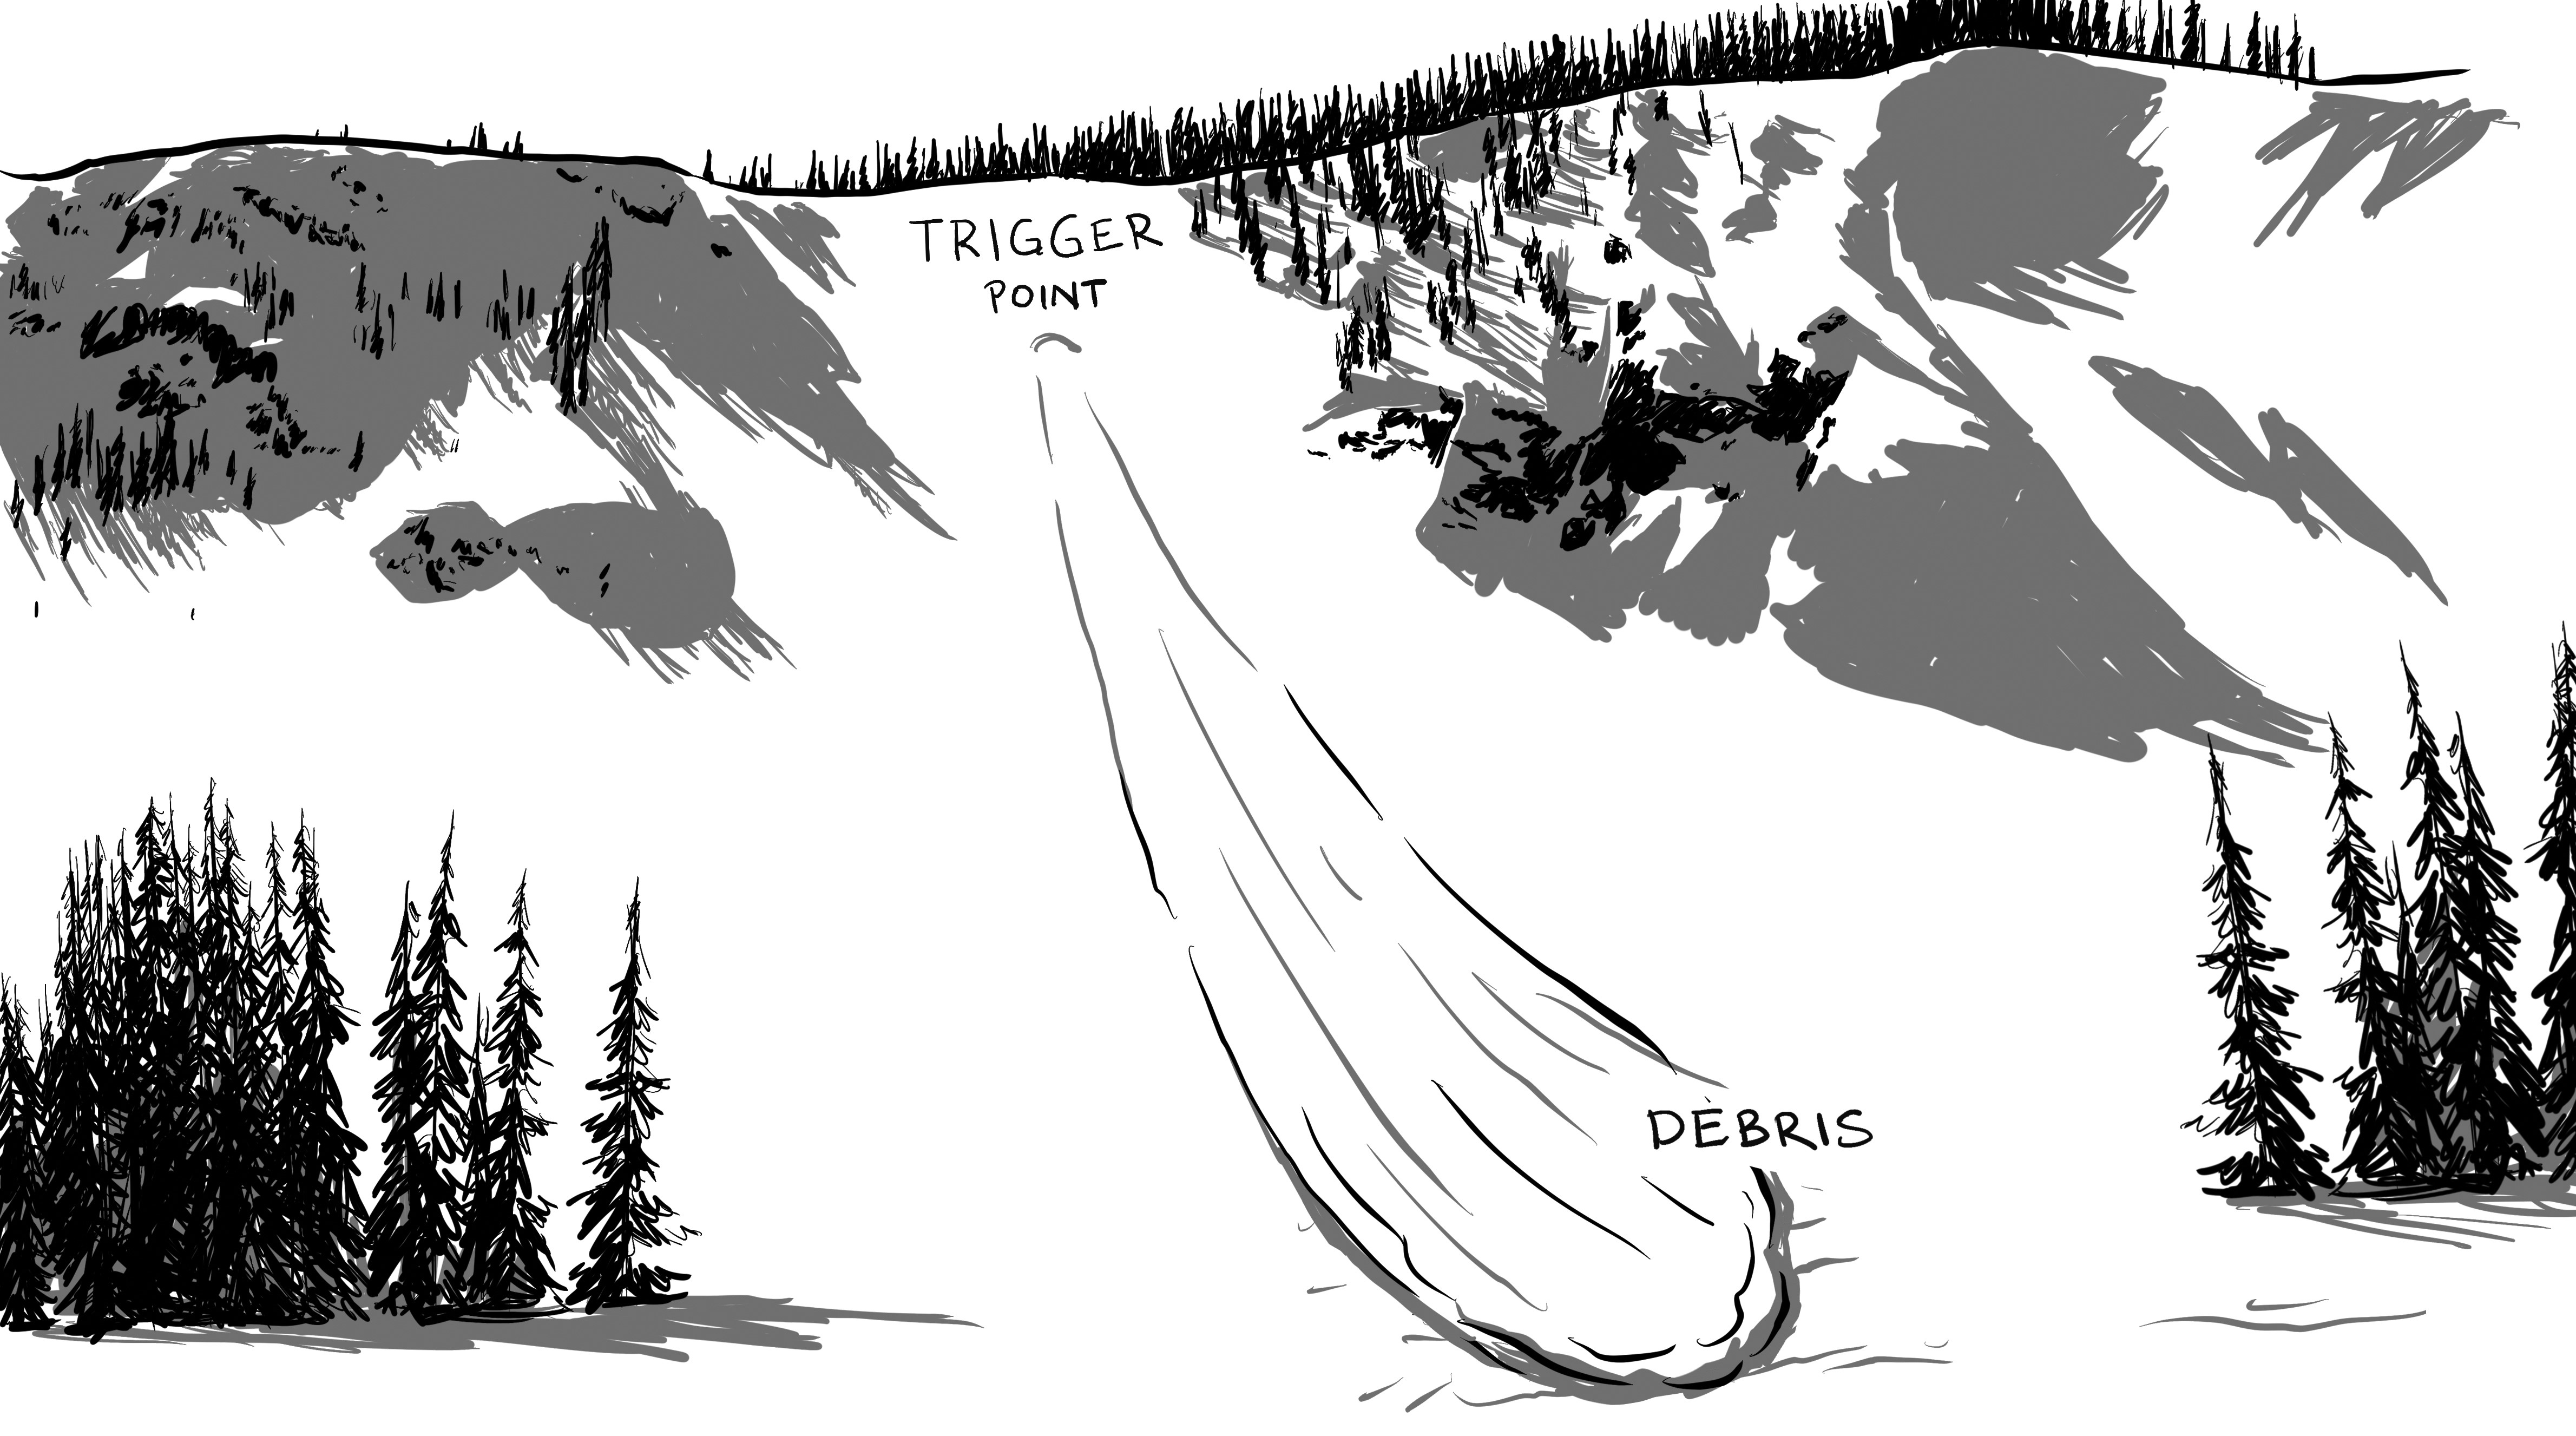 Loose Snow avalanches are the release of weak snow at the surface. They start at a trigger point and entrain more snow as they move downhill, forming a fan-shaped avalanche.
 Slab avalanches are the release of a cohesive layer of snow, or slab, with a weak layer below it. The weak layer collapses, which quickly travels, or "propagates," from the initial trigger point.
Avalanche Types are further subdivided into the following:
![]() Dry Loose avalanches require weak snow at the surface - often weaker than the snow under it. Most Dry Loose avalanches occur within new snow, or at the new/old interface. Other names for Dry Loose avalanches include “point-release” avalanches, or “sluffs.”
Dry Loose avalanches require weak snow at the surface - often weaker than the snow under it. Most Dry Loose avalanches occur within new snow, or at the new/old interface. Other names for Dry Loose avalanches include “point-release” avalanches, or “sluffs.”
Dry Loose avalanches often have less mass than other avalanche types. This can lead people to underestimate their destructive potential, dismissing them as “just sluff.” However, Dry Loose avalanches can be destructive if enough snow gets entrained, or by stepping down to a deeper weak layer and triggering a different avalanche type. And even small Dry Loose avalanches can be consequential in the wrong terrain.
Dry Loose avalanches often occur after a recent storm, typically within 24-48 hours. The rate of new snow accumulation needs to outpace bonding within the new snow or at the new/old interface. High intensity and/or cold storms are more problematic than low intensity and/or warm storms. Similar weather events can lead to Storm Slab and Wind Slab conditions, or can add enough load to trigger other avalanche types.
Settlement within the new snow promotes bonding, and over time makes Dry Loose avalanches less likely. The time after a storm that Dry Loose avalanches remain possible can be prolonged if subsequent weather doesn’t promote settlement and bonding. Although not common, it’s possible for old snow at the surface to facet and become the weak layer for Dry Loose avalanches, instead of new snow.
![]() Wet Loose avalanches require wet, unconsolidated snow at the surface - often wetter and weaker than the snow under it. They can occur within new snow or old snow. Liquid water breaks existing bonds and lubricates between grains. If a crust or similar strong layer exists under the wet snow, liquid water can pool on the strong layer and lubricate right above it.
Wet Loose avalanches require wet, unconsolidated snow at the surface - often wetter and weaker than the snow under it. They can occur within new snow or old snow. Liquid water breaks existing bonds and lubricates between grains. If a crust or similar strong layer exists under the wet snow, liquid water can pool on the strong layer and lubricate right above it.
Wet Loose avalanches tend to start small and move slowly, but often gain significant mass as they entrain additional snow. This can make them more consequential than a Dry Loose avalanche of equivalent size. A slight nudge from a small one can knock a person off their feet or a snowmobile off-line, and if you’re caught, the mass might cause serious trauma even at slow speeds. Burial in a relatively shallow Wet Loose avalanche can be impossible to self-extricate from, and if your head is buried, there is very little air available in the debris for breathing. Like Dry Loose avalanches, they sometimes step down and trigger different avalanche types - often a Wet Slab.
Wet snowfall, rain, and warming from air temperature and sun all contribute to Wet Loose conditions. Wet Loose conditions can remain for as long as liquid water is present in the surface snow. During mid-winter rain-on-snow or rapid warming events, Wet Loose conditions can develop quickly but also stabilize quickly when cold temperatures return. In the springtime, Wet Loose conditions may exist during the heat of the day but not during cooler hours. Eventually, nights become too warm for effective overnight refreezes, and Wet Loose conditions can exist any time of day.
![]()
Storm Slab avalanches have a stronger slab of new snow on top of a weaker layer of new snow. Sometimes, the difference between the slab and the weak layer can be dramatic, like strong warm snow on top of weak cold snow (from an "upside down" storm that begins cold and ends warm). Other times, the difference can be more subtle and difficult to observe. The slab just needs to be slightly stronger than the weaker snow under it.
Storm Slab avalanches tend to form across the landscape more uniformly than other slab types, so trigger points for Storm Slabs are somewhat more predictable. This doesn’t mean they are any less destructive. Storm Slabs are common within 48 hours of a storm with more than ~12” of new snow. Shallower slabs can still be dangerous if they entrain enough snow along the path, or if they’re triggered in consequential terrain.
Settlement within the new snow promotes bonding, and makes Storm Slab avalanches less likely within 24-48 hours. This is the source of the poorly understood and poorly applied “24-hour rule” that people use to convince themselves avalanche danger has diminished after a storm. Instead of betting your life on a rule of thumb, it’s better to actually observe settlement and bonding at the weak layer(s) before deciding Storm Slab conditions are no longer present. And, while storm snow settlement decreases the likelihood of Storm Slabs, it doesn’t always do the same for other avalanche types that may also be present.
![]()
Wind Slabs are formed when wind moves snow as it falls from the sky, or redistributes snow from windward sides of terrain features. The wind breaks the snow into smaller pieces, which then land on leeward features as the wind decelerates. When these smaller pieces accumulate, they fit closely together and can form a stronger layer than the snow they land on. As with Storm Slabs, ~12” is a common threshold for Wind Slabs to present concern. Because of their redistribution patterns, slab thickness is often highly variable across the landscape. On the scale of an individual slab, Wind Slabs can be thinner near their edges, and thicker towards their middle.
Wind Slabs form on leeward terrain features. Wind Slab locations can sometimes be recognized by seeing or knowing wind patterns and their interactions with terrain. If visibility is good, you may be able to see changes in surface texture between areas with and without wind deposits. Other clues include increased snow depth, reduced surface penetration, and a different “feel” on leeward features, but these observations require you expose yourself to the potential slab. Beware of Wind Slabs during or after winds with recent snowfall or weak snow on the surface available for wind transport.
Settlement does act upon the weak layer in a Wind Slab, but often not as predictably as with Dry Loose and Storm Slabs. The stiffness of the Wind Slab can help support the slab over the weak layer, delaying settlement. Because new Wind Slabs can form after snowfall has ended, timing estimates for settlement are difficult. Wind events that continue for extended periods can result in prolonged hazard. Similarly, as winds shift directions, the anticipated location of Wind Slabs can change. Winds can reduce likelihood in one location, but increase it in another.
![]() Cornice Fall avalanches are closely related to Wind Slabs, because they are formed by similar weather. They are the release of an overhanging mass of snow that forms as the wind decelerates over terrain features, and deposits snow immediately on the leeward side.
Cornice Fall avalanches are closely related to Wind Slabs, because they are formed by similar weather. They are the release of an overhanging mass of snow that forms as the wind decelerates over terrain features, and deposits snow immediately on the leeward side.
Cornices can vary in size and thickness, and their dimensions can be difficult to estimate – especially from above. Cornices overhang slopes, causing a constant battle between gravity and the strength of the cornice. They can droop slowly over time or break suddenly. They can fail where they are visibly overhung or fail at unexpected distances from their perceived edge. Cornice Falls can cause damage by striking you, by breaking from under you and causing a fall, and by triggering a secondary avalanche type – or any combination of these.
Because cornices overhang slopes, gravity and settlement act upon them differently than other avalanche types, and don’t necessarily represent a “healing” process. A complex relationship exists between gravity, the strength of the cornice and its deformation properties, and further weather events that act upon the cornice. Time can reduce their hazard, or bring them closer to failure. Testing a cornice by creeping out on it from above is a terrible way to learn how unpredictable and dangerous they can be. Observe cornices from a safe spot to the side.
![]() Persistent Slabs form as a layer of cohesive snow on top of a facet layer or surface hoar layer. Both facets and surface hoar are the result of vertical growth, so they have more vertical strength than shear strength, and can support some weight on top of them. This structure is comparable to building on top of a row of dominoes or on top of a house of cards. Once the burden above facets and surface hoar becomes too much, they can collapse and propagate long distances.
Persistent Slabs form as a layer of cohesive snow on top of a facet layer or surface hoar layer. Both facets and surface hoar are the result of vertical growth, so they have more vertical strength than shear strength, and can support some weight on top of them. This structure is comparable to building on top of a row of dominoes or on top of a house of cards. Once the burden above facets and surface hoar becomes too much, they can collapse and propagate long distances.
Persistent Slabs are known for their unpredictable nature. Often their dimensions extend beyond what would be expected of a Storm Slab or Wind Slab in the same terrain, and they can be triggered from features not considered to be “typical” trigger points, including terrain above, below, and adjacent to them. As with other slab types, ~12” of cohesive slab above a persistent weak layer is an important threshold. However, both slab thickness and weak layer distribution can be highly variable in Persistent Slabs.
Because facets and surface hoar have some vertical strength, they tend to resist settlement and persist for extended periods and sometimes even whole seasons. Settlement is less likely to act upon these weak layers; instead, it’s more likely to act upon any new snow above them, forming the slab. Damage to the vertical structure in the weak layer can occur slowly over time without causing collapse, eventually improving the shear strength. Another way for persistent weak layers to “heal” is that both facets and surface hoar can sublimate into rounds - under the right conditions and over time.
![]() Deep Slab avalanches are Persistent Slabs that are deep enough to be difficult to trigger, and are capable of producing very large and destructive avalanches.
Deep Slab avalanches are Persistent Slabs that are deep enough to be difficult to trigger, and are capable of producing very large and destructive avalanches.
Deep Slabs are often triggered from areas where the weak layer is relatively shallow, and the collapse propagates to where it is relatively deep. Because these avalanches are deep, difficult to trigger, and remain unstable for prolonged periods, maintaining awareness of the danger they pose can be difficult without significant digging and/or detailed tracking of the snowpack’s development. Because they are capable of producing large avalanches, they often run much farther than expected, and can cause harm well into the flats below. Deep Slabs avalanches are low likelihood and high consequence events. This makes them easy to forget about or dismiss as unlikely, but when people trigger them, not many survive to learn from their mistakes.
It’s not uncommon for Deep Slabs to last an entire season, with cycles of varying reactivity. A high level of uncertainty is associated with these avalanches.
![]() Wet Slab avalanches are the release of a cohesive layer of snow that is near 32oF and moist or wet. The snowpack structure required for Wet Slab avalanches can be very similar to their dry counterparts, but with liquid water in the slab or weak layer. Storm Slabs, Wind Slabs, Persistent Slabs, and Deep Slabs can all become Wet Slabs by introduction of water. Water can also weaken and lubricate layers and interfaces within the snowpack that wouldn’t otherwise represent weaknesses when dry. Wet precipitation can also be a significant stress on the snowpack.
Wet Slab avalanches are the release of a cohesive layer of snow that is near 32oF and moist or wet. The snowpack structure required for Wet Slab avalanches can be very similar to their dry counterparts, but with liquid water in the slab or weak layer. Storm Slabs, Wind Slabs, Persistent Slabs, and Deep Slabs can all become Wet Slabs by introduction of water. Water can also weaken and lubricate layers and interfaces within the snowpack that wouldn’t otherwise represent weaknesses when dry. Wet precipitation can also be a significant stress on the snowpack.
Whereas dry slab types are triggered when people or weather add weight that tips the stress side of the stress vs. strength balance in the snowpack, Wet Slabs also fail due to decreasing strength. This is a fundamentally different and less predictable trigger. Once triggered, the wet debris will flow differently from dry debris. It often moves more slowly and follows the contours of the landscape more closely. With more mass for the equivalent volume, wet debris can be more destructive.
Wet Slab avalanche cycles will subside after a complete refreeze, though they still occur along the continuum of refreezing. Just because the surface has refrozen does not mean liquid water is no longer present elsewhere in the snowpack. Without a complete refreeze, Wet Slab cycles can decrease once drainage channels become well established in the snowpack, and again in late spring to early summer after the snowpack has fully transitioned to wet.
![]() Glide avalanches occur when a generally uniform snowpack rests on top of smooth ground or rock slabs, and liquid water lubricates between the two, resulting in release of the full depth of the snowpack. They typically involve a wet or refrozen snowpack. The gliding motion can begin slowly and remain slow, or climax into a destructive avalanche. Glide avalanches are often preceded by a visible glide crack that grows over time as the full depth of the snowpack glides downhill. It’s uncommon for them to be triggered by a person adding weight to tip the stress vs. strength balance; instead they are almost exclusively triggered due to loss of strength.
Glide avalanches occur when a generally uniform snowpack rests on top of smooth ground or rock slabs, and liquid water lubricates between the two, resulting in release of the full depth of the snowpack. They typically involve a wet or refrozen snowpack. The gliding motion can begin slowly and remain slow, or climax into a destructive avalanche. Glide avalanches are often preceded by a visible glide crack that grows over time as the full depth of the snowpack glides downhill. It’s uncommon for them to be triggered by a person adding weight to tip the stress vs. strength balance; instead they are almost exclusively triggered due to loss of strength.
Glide avalanches are a very unpredictable avalanche type, but accidents involving people are rare. When they happen, snow quality typically isn’t very good and people aren't out recreating. Glide avalanches usually occur in the same locations from year to year, so management involves avoiding these areas when Glide avalanche conditions exist.
Weather events leading up to Glide avalanches are varied and not as directly tied to their release as with other avalanche types. This is because the source of liquid water at the ground/snow interface need not be from rain or snowmelt percolating from the surface. Instead, the warmth of the ground can melt snow to lubricate at this interface. Warm air temperatures do contribute, as does sunlight warming exposed dark soil and rock, but these are not easily timed with the release of Glide avalanches.
Once the snowpack structure for Glide avalanches has formed over the necessary terrain, the threat is likely to remain for extended periods. Cold enough temperatures can refreeze the layer of water at the ground, but at some point, it’s likely to return to its liquid phase. An avalanche or seasonal melting of the snowpack may be what’s required for the final destruction of this setup.
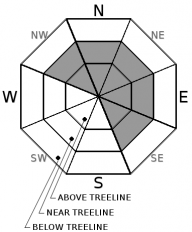
Location in the terrain will vary for each avalanche type predicted for the day, because weather does not build the snowpack uniformly over the landscape. Across the continent, there are different snow climates because of different weather patterns. Within a specific region, there will be patterns by aspect and elevation.
Aspect is the direction that terrain faces. Aspect in relation to the wind and to the sun are important contributors to the development of the snowpack, and therefore to the location of avalanches.
Aspect to wind is referenced as windward (facing into the wind) and leeward (facing away from the wind). Wind will remove snow from windward terrain and deposit it onto leeward terrain. In general, hazardous avalanches are more likely to be encountered on leeward aspects because of the volume of snow that is deposited, and depending on the snowpack structure, just about any avalanche type can be located there. Windward aspects can still have enough snow to be of concern, so don't rule them out just because of this generalization.
Aspect to sun is referenced simply as sunny or shady. Of course, this changes from sunrise to sunset, and it also changes as the height of the sun in the sky changes throughout the season. In early to mid-winter, when air temperatures are generally cold, shady slopes remain cold and are likely to facet above a relatively warm ground, and are also likely to preserve whatever other snowpack structure exists. During the same times, warmer sunny slopes change faster and are more susceptible to settlement. They can also develop warm melt layers and crusts near the surface that put warm and cold next to each other and promote faceting. As the season progresses, previously cold shady slopes get warmer and change faster than earlier in the season, and sunny slopes may have liquid water present in the snowpack. Sunny slopes will begin their springtime transition to a diurnal melt/freeze cycle sooner than their shaded counterparts.
Elevation influences precipitation, temperature, wind, and sun. Elevation can be measured in feet above sea level, but it’s also common to reference three elevation bands; below treeline, near treeline, and above treeline. These are generalizations that can vary by terrain feature. Elevations can also be referenced simply as low, mid, and high.
As elevation changes, the resulting precipitation and temperature changes are closely related, due to orographic lifting and lapse rate. Orographic lifting is the mechanism by which air masses are forced upwards when they move over terrain, like a mountain or group of mountains. As the air mass rises, it expands and cools predictably, according to its lapse rate. Dry air, at less than 100% relative humidity, will cool 5oF per 1,000ft of elevation gain. Moist air, at 100% relative humidity, has a more variable lapse rate, but a typical value is 2.5oF per 1,000ft.
As a winter enthusiast, you want warm and moist air masses to rise and cool. This is what causes snow to fall. However, because orographic lifting will increase precipitation rates as elevation increases, avalanche problems that are connected to recent loading can be different at higher elevations, with larger avalanches possible where accumulation is greatest.
Precipitation type can also change as temperatures vary across different elevations. Rain might fall at lower elevations, wet snow at mid elevations, and dry snow at higher elevations. Avalanche problems connected to precipitation type will thus be found at different elevations. For example, an avalanche problem related to a rain crust will be located at the elevations where it rained.
Even without precipitation, temperature changes across elevations can have influence over the snowpack and the resulting location of avalanche problems. Typically in mid-winter, avalanche problems connected to warm temperatures will be found at lower elevations, and problems connected to cold temperatures at higher elevations – though of course, mid-winter warming can also occur at high elevations. A special case of this is during inversions, when cold air pools at low elevations and warm air rises to high elevations. If the cold air has enough moisture content, inversions can also trap fog at lower elevations. Inversions influence and can even reverse the likely elevations for avalanche problems connected to warm or cold temperatures, or the balance between sun and humidity from fog. For example, an inversion can cause surface hoar to grow at the specific elevations where the fog and clear skies have some overlap, or at reverse elevations from “normal,” due to warm daytime air at high elevations that cools at night.
Elevation will also influence wind speed and direction, and thus the locations for avalanche types associated with wind and/or lack of wind. At higher elevations, without terrain to interrupt the flow of wind, wind speeds can be stronger and more directionally consistent than at lower elevations, where more terrain disrupts and redirects the flow of wind. As a result, Wind Slab and Cornice Fall avalanches are more likely to be encountered at mid to high elevations, and Storm Slabs and Persistent Slabs on surface hoar at mid to lower elevations. Local topography and/or unusual wind events can change these generalizations.
Elevation also influences the sun’s impact on the snow through atmospheric filtering, the radiation balance between sunlight and air temperature, and cloud heights. Atmospheric filtering is the absorption of energy from the sun by the atmosphere, resulting in more energy transmitted to the snow at higher elevations and less at lower elevations. This energy is in a complex balance with heat energy from air temperatures (input and output to/from the snow), and each of these are also affected by cloud cover. Because all three of these change over elevation, the balance between them changes as well. As a result, avalanche types associated with heat can be distributed by elevation. And surface conditions associated with heat, like melt layers, crusts, surface hoar, and near surface facets, can change with elevation, influencing distribution of avalanche types once buried.
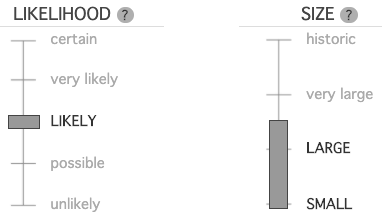
Likelihood and Size are the final components to the avalanche problem. Similar concepts are also connected to the danger rating provided by an avalanche forecast. Although the danger rating is one of the most noticeable components of a forecast, it isn’t as complete a way to anticipate conditions as the avalanche problem, and won’t be discussed in detail here.
Likelihood is the chance of encountering and triggering a particular avalanche type. It combines the spatial distribution of the type with its sensitivity to triggering. The spatial distribution is an estimate of how much terrain the problematic structure covers within the anticipated locations: Is everywhere, only in specific places, or is it isolated? The sensitivity is an estimate of how easy it might be to trigger if you do encounter it: Is it touchy, stubborn, or somewhere in between?
Counterintuitively, the highest likelihood may not represent the highest risk. The highest likelihood means that a particular avalanche type is sure to be encountered and is easy to trigger. If you are at all capable of maintaining awareness while out on the snow, this likelihood would be obvious, and you and your partners would keep your distance from avalanche terrain without much need for discussion. Risk involves uncertainty, which is greatest towards the middle of the likelihood scale. Avalanche accidents are statistically most common here.
Size is based on the destructive potential of avalanches, so has a direct connection to consequence. Small avalanches are relatively harmless to people unless the terrain is unusually high consequence. Anything bigger can kill you even in forgiving terrain. The destructive scale is a common way to describe avalanche sizes. D1 avalanches are small, D2 are big enough to bury, injure or kill a person, and D3 avalanches are large. There are also D4 and D5 avalanches, but the important threshold is D2, so distinction between the rest is somewhat pointless.

After anticipating conditions, you need to acknowledge your uncertainty about them before creating safety margins. If you’re using an avalanche forecast, how certain do you think the forecasters are? Are the weather, the snowpack, and the avalanche problems straightforward and well supported by data? Some avalanche forecasters will include language in their narrative to communicate their uncertainty, or use a graphic to visually represent this. Regardless of forecaster uncertainty, how familiar are you and your partners with managing yourselves in the anticipated conditions?
If you don’t have an avalanche forecast available to anticipate conditions, and are instead gathering your information from other sources, assume a very high level of uncertainty when you create safety margins.
Either way, uncertainty is both the “known unknowns” and the “unknown unknowns.” If you’re able to identify uncertainty in the avalanche forecast or in your own information, it’s because of known unknowns, and with practice you can better manage these uncertainties and strive to reduce them. However, the unknown unknowns have the potential to surprise you no matter your level of preparation and experience. Recognition of this is the difference between an overconfident rookie and a seasoned veteran. The true sign of an “expert” is to acknowledge the unknown unknowns with humility and appropriate safety margins.


This website is owned and maintained by the non-profit arm of the Sierra Avalanche Center. Some of the content is updated by the USDA avalanche forecasters including the forecasts and some observational data. The USDA is not responsible for any advertising, fund-raising events/information, or sponsorship information, or other content not related to the forecasts and the data pertaining to the forecasts.