In partnership with: 
Backcountry travel can be too dynamic to follow specific, linear plans. The dynamic nature contributes to the sense of freedom that we seek. But the line between freedom and chaos is a thin one, and crossing it in avalanche terrain can be deadly. Safety margins are the rules that you create before leaving, to keep from crossing that line once you’re out on the snow. Predetermined safety margins help reduce your exposure to avalanches, and make decisions easier during the “stoke” of the day. Create safety margins accounting for your partners and anticipated conditions, with room for error and uncertainty. Safety margins can be based on:
Make sure your safety margins are straightforward and easy to follow. They should be simple enough that they’re easy to communicate without confusion. If you think you’ll have difficulty following the rules, don’t make them to begin with.
Create big picture safety margins without skipping ahead to your specific plan for the day - save this for when you confirm details. Otherwise, you’d probably create biased margins to justify something you’ve already decided upon for other reasons.
Once you’re out on the snow, you can rein in on your safety margins, but don’t allow yourself to let loose on them. Bad things happen when people break their own rules. Innumerable accidents have occurred just after the victims said something like “I know we agreed not to do this, but…”
Avalanche exposure is a function of your position in the terrain, and is the most controllable and impactful way that you can manage your risk. The reality of human nature is that your partners come with a high level of uncertainty, and even expert group management doesn’t represent 100% control. Avalanche conditions often have a high level of uncertainty, and you have zero control over them. Your position in the terrain is the third ingredient required for an avalanche accident (people, conditions, and terrain), and you do have a high level of control over where you go. This is why it’s vital to predetermine what kind of terrain is acceptable for the day.
There are ongoing attempts to formally classify and catalog terrain by its general avalanche exposure, independent of current conditions. The Avalanche Terrain Exposure Scale, or ATES, is a Canadian system gaining some acceptance in the United States. In Canada, the government hires avalanche professionals to evaluate and catalog terrain at popular destinations, and makes the information available to the public. It’s similar to difficulty ratings at a ski area, where you can seek out or avoid terrain using a trail map without having to evaluate the terrain yourself.
Like any human construct that attempts to put complex natural phenomena into neat little boxes, the ATES is imperfect. And, although some ski/snowboard guidebooks and online mapping programs are beginning to experiment with the ATES in the United States, as of this writing it’s not yet a viable tool for most regions - especially for motorized users. For these reasons, this Daily Flow user guide will convey similar concepts about general avalanche exposure without the formal ATES terminology.
Non-Avalanche Terrain
Non-avalanche terrain is well under 30° in steepness, and will never produce an avalanche big enough to bury or kill a person (a D2 avalanche). This also needs to account for the slopes overhead – low angled terrain is still avalanche terrain if there’s exposure to avalanches from above.
Non-avalanche terrain includes flat meadows and low angled, gladed or forested terrain. There should not be any vegetation clues that that avalanches have ever occurred. Above treeline, non-avalanche terrain can be hard to discern, so even small slopes need to be very low angle.
There may be small features that are 30° or steeper, but they can’t be big enough to produce a D2 avalanche. Judging the potential size of an avalanche on small features is difficult; if you’re in doubt, assume the worst. Conservatism is justified on days that you’ve agreed to stick with non-avalanche terrain.
A Little Exposure
Terrain with a little exposure to avalanches is primarily under 30o unless it’s heavily forested. It could include small and infrequent avalanche paths that are well defined, where exposure can be reduced or eliminated by using simple group management techniques.
Below treeline, most slopes approaching or steeper than 30o should have dense enough tree cover to indicate that avalanches are rare. Above treeline, where vegetation clues aren’t available, slopes should be low angle, and anything steeper than 30o needs to be small and low consequence, or easy to recognize and avoid entirely.
Terrain traps are features that increase the consequences of even small avalanches (see more on terrain traps below). In terrain with a little exposure, some terrain traps can be present, but they should be few, isolated, and not represent “certain death” in case of an avalanche.
Medium Exposure
Terrain with medium exposure can include a few well defined avalanche paths above 30o, including slopes between 35-40o (statistically where most avalanches start). It’s challenging to reduce or avoid exposure in this terrain, but it is still possible. It requires skill at identifying what makes the terrain prone to avalanches, and skill at group management.
Tree cover can vary in medium exposure terrain, and avalanche paths can run from above treeline all the way to valley floors. However, these large paths should be few and separated from each other. Above treeline, it can be more difficult to determine where avalanche paths are, but with skill you should still be able to identify options for reducing exposure.
Terrain traps may become more consequential in medium exposure terrain, potentially causing serious trauma or deep burials. Surviving an avalanche into a terrain trap might require the combination of a quick companion rescue and luck.
Big Exposure
Terrain with big exposure can include multiple avalanche paths, with a high percentage of terrain between 30-45o. It may be very difficult to reduce exposure, or impossible to avoid it completely. Recreating here should be saved for the days with your most reliable partners, and when you’re confident that conditions won’t produce avalanches.
Tree cover can be sparse in terrain with big exposure. Avalanches may not follow well defined paths, and can even converge and overlap.
Terrain traps are likely to be very consequential, including combinations of depressions, gullies, and cliff bands within avalanche paths, and terrain traps with hidden avalanche paths above them. Some may even represent “certain death” in case of an avalanche.
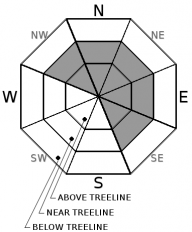
Elevations and Aspects are helpful safety margins to use in addition to general exposure. If you’re using an avalanche forecast, elevations and aspects are almost sure to be part of the avalanche problem; nearly all avalanche centers use a "locator rose" to show you the elevations and aspects where an avalanche type is most likely to exist. Forecasts that don’t include a locator rose usually communicate similar information within their narrative instead of graphically.
You can create elevation and aspect safety margins by agreeing to avoid the locations where encountering avalanches is most likely. For example, if you anticipate Persistent Slab avalanches on shady aspects near and above treeline, you can agree in advance to avoid those locations.
Use caution when using a locator rose to create safety margins. It should be interpreted on a broad, regional scale. Elevation and aspect margins can be especially problematic in big and/or convoluted terrain, where snowpack characteristics from several elevations and aspects can exist on one slope.
Slope and Feature safety margins can be used by agreeing to avoid slopes and features with predetermined characteristics. These characteristics can be anything more specific than elevation and aspect, and often they'd reference some combination of terrain traps and trigger points. This scale of margins can become quite narrow, and implementation can approach “threading the needle." Unless you have advanced understanding of snowpack formation, and high confidence about current conditions, terrain, and your partners, it might be wise to stick with broader margins. Similarly, slope and feature safety margins are at such a small scale, they probably only reduce your exposure to small, human triggered avalanches. If large or natural avalanches are possible, paint your margins with a wider brush.
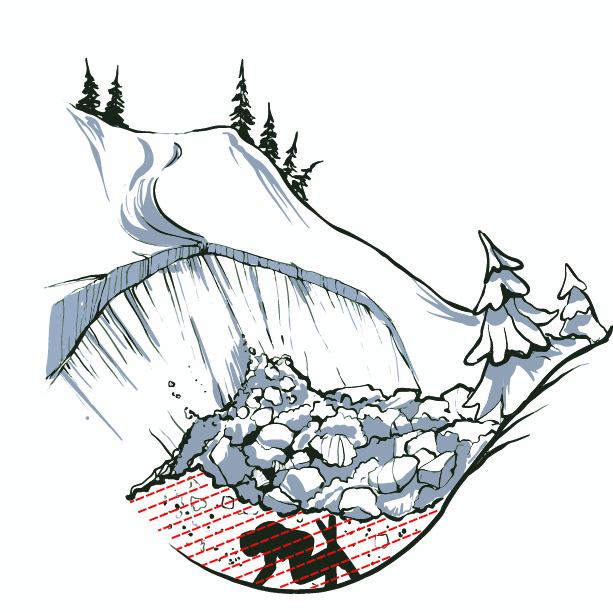 Terrain traps are features that increase the consequences of even small avalanches, by increasing possible burial depths, increasing the chances of trauma, or by making drowning and/or hypothermia likely. Terrain traps include depressions, open holes, abrupt transitions, trees, rocks, cliffs, cornices, and any open water in or near an avalanche path. Terrain traps can be added to other safety margins, like “a little exposure is OK today, but avoid all terrain traps.” Or, if some terrain traps are more concerning than others, they might deserve their own specific margins, like “don’t go above cliffs today.”
Trigger points are features where avalanches are most likely to be triggered. These are places where either the weak layer is especially weak, where the slab above the weak layer is especially thin, or where the stress on the snowpack is greatest. Common trigger points include any part of the slope between 35-40o, convexities and concavities, shallowly buried rocks, below cornices, and near trees or exposed rocks that interrupt the slab and/or absorb heat from the sun. Like terrain traps, trigger points can be added to other safety margins. However, avalanches don't always play by the rules, so don't bet your life on avoiding them by mere feet or yards.
Timing margins can be based on the time of day, or weather events that don’t have a reliable timing forecast. These safety margins are usually straightforward, but they’re also the rules that can be most tempting to break. If “just a little longer” could be the difference between life and death, your timing margins aren’t robust enough. Make sure to give yourself some room for human nature, in addition to allowing for error and uncertainty.
Time of day safety margins can be used when the likelihood of avalanches will increase with a direct connection to the time of day. Rapid warming in the springtime is a classic example; it’s often predictably cold in the morning and warm in the afternoon, so if Wet Loose avalanches are your concern, you could agree to travel on steep, sunny slopes in the morning but not the afternoon. Give yourself plenty of room for error! Don’t wait to see the first avalanche of the day – it might be one avalanche too late.
Weather events are useful as safety margins when you can’t use a specific time of day. Rain on snow, major new snow accumulations, active wind loading, and rapid warming are all weather events that should prompt you to pull back on the reins. For example, you could agree to certain margins until wind loaded snow begins to accumulate, at which point you’ll reduce exposure. However, resist the urge to use specific numerical thresholds – it’s too easy to convince yourself you haven’t met the threshold if everything else is going well.
Most timing margins will suggest reducing exposure as the day progresses. Avalanche likelihood can also decrease throughout the day, but timing margins that increase exposure as the day progresses are not usually recommended. Absence of evidence is not evidence of absence, but a lack of evidence can be used to rationalize breaking your own rules and increasing exposure, defeating the whole purpose of creating safety margins in the first place.


This website is owned and maintained by the non-profit arm of the Sierra Avalanche Center. Some of the content is updated by the USDA avalanche forecasters including the forecasts and some observational data. The USDA is not responsible for any advertising, fund-raising events/information, or sponsorship information, or other content not related to the forecasts and the data pertaining to the forecasts.