In partnership with: 
Enjoying the “stoke” of the day - in avalanche terrain - is no time for depending on assumptions. Instead, before leaving, make sure that you and your partners have confirmed important details. This can help prevent surprises and minimize confusion once you’re out on the snow - reducing risk and providing better flow at the same time. Confirm all the details about your partners, conditions, and safety margins, and then agree to a final plan. This should include:
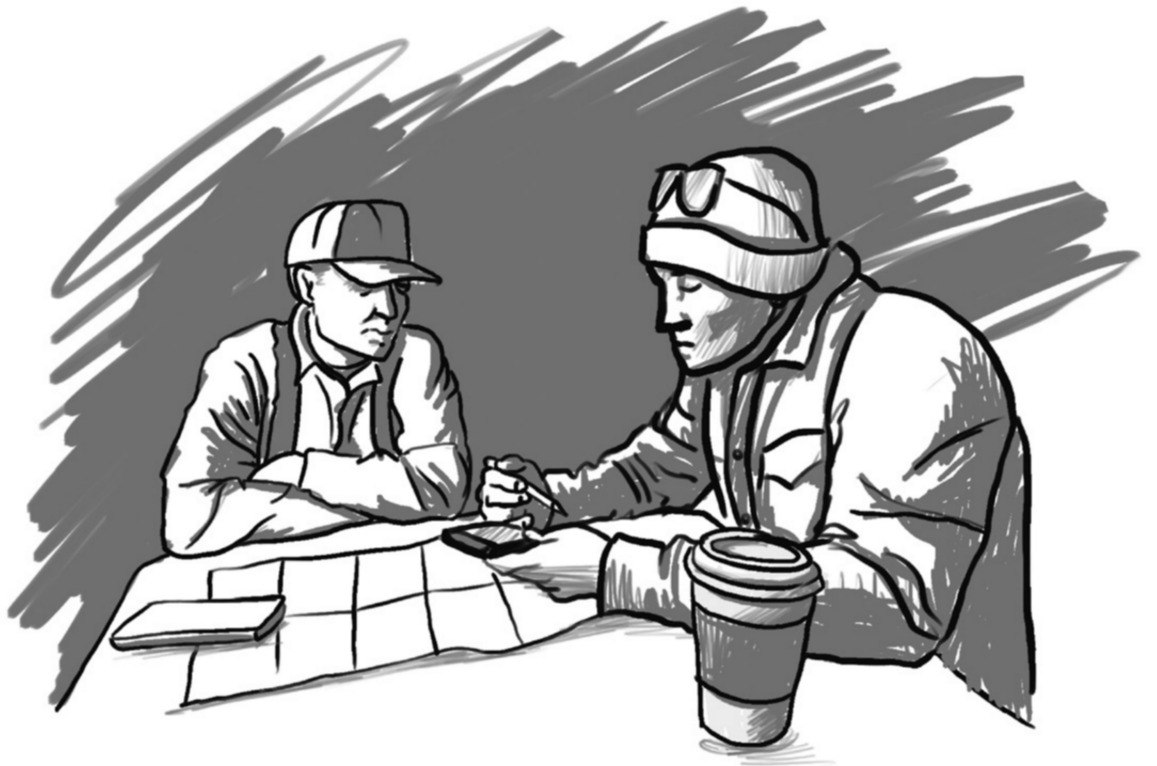
Professionals use a written format to confirm details. This provides structure to help avoid overlooking anything, and serves as a contract between co-workers. It also makes the details easy to share within the workplace in case something goes wrong.
Most recreational users confirm details with each other informally. This can be done by phone/text, or in person at a coffee shop or similar meeting place before the day begins.
Someone external needs to know the details you’ve agreed to, in case outside assistance becomes necessary. Make sure all your partners know who this is, including their contact information. Some people also leave a note outlining plans on their vehicle’s dashboard at the trailhead.
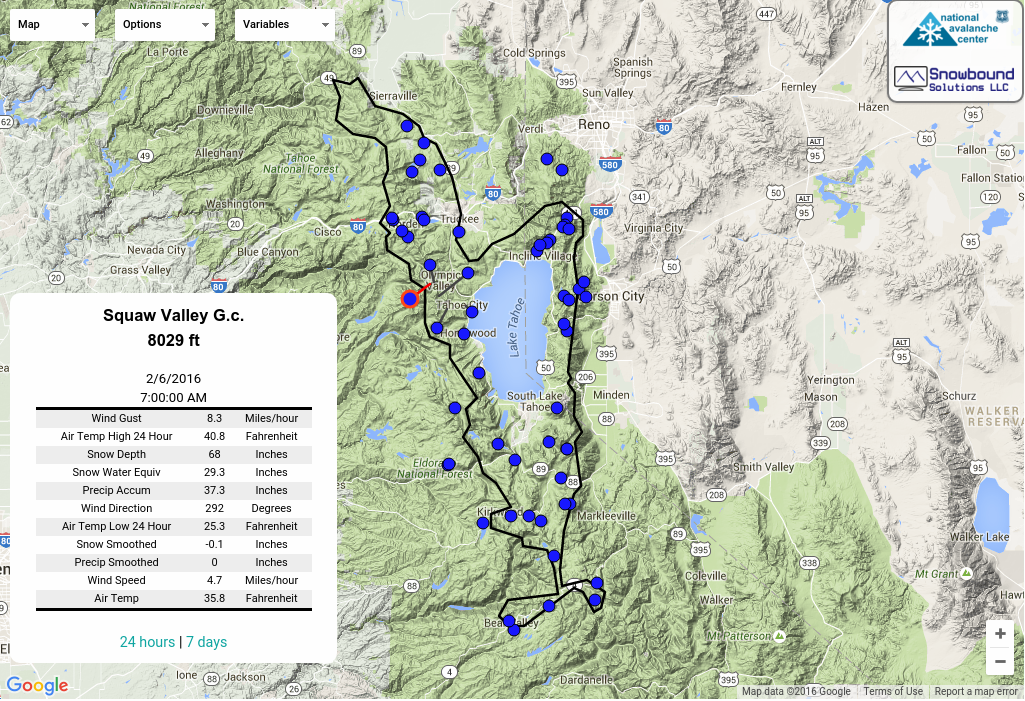
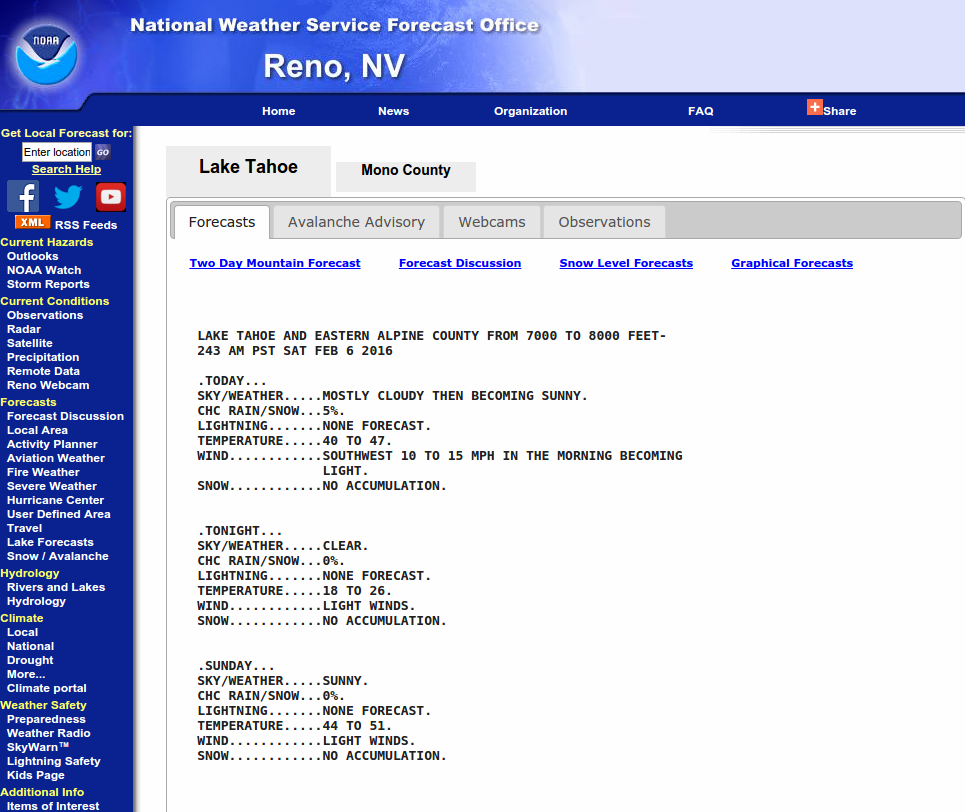
Your trailhead should be chosen to provide options within your safety margins. Don’t go someplace where you’re likely to break your own rules; this is a sure setup for failure. Use maps and online resources when discussing options with your riding partners. Many online resources have slope angle shading features to help you identify terrain that fits your margins and terrain that doesn’t. Satellite imagery with 3D viewing capability can be very helpful for terrain visualization.
A start time and return time are important to agree upon in advance. Unexpected time constraints can be more than annoyances; they can interfere with group management and compromise your risk management process. Make sure everyone is aware of any time constraints, and that sunset times along with food/fuel/equipment limitations are also discussed. To make it back to the trailhead by your return time, you’ll agree on turn-around times specific to each of your route options.
Agree to a few viable, enjoyable route options. Success needs to be defined by achieving any of them. Resist the urge to create “ideal” and “backup” options, so you don’t create bias toward one versus the other. However, they need to be different enough to help you manage uncertainty. It can be helpful to use “if-then” statements to evaluate options, like “if there’s more new snow than anticipated, then we go to…”
Use maps and online resources, or expert local knowledge if you have it, to evaluate options within your safety margins. Motorized users should not be overly linear and specific, except when established trails are used. Instead, link terrain together at the drainage and mountain scale, like “use the Chicken Creek drainage to gain Jacks Peak, then link to Pratt Creek.” Non-motorized users can plan more linear routes, especially where there are commonly established up-tracks. Ideally, you should evaluate multiple up-tracks, but if there’s only one established up-track from your trailhead it should have multiple options for descending.
Include a turnaround time for each option that gets you back to the trailhead by your return time. Lots can still go wrong after your turnaround times, so be conservative with them.
No plan is infallible. Carrying the necessary gear can help prevent emergencies and also reduce the consequences of them. Motorized users can get separated from their machines, so emergency gear needs to be carried in a backpack or vest, not in tunnel bags.
Avalanche gear for everyone is a must, even if you don’t plan to go into avalanche terrain. Accidents have happened to people who had the best intentions to avoid avalanche terrain, but for various reasons ended up in it. Accidents have also happened to people who didn’t even realize they were in avalanche terrain.
Carrying avalanche gear is no excuse to trigger avalanches. Many victims die from trauma, not suffocation, so a quick recovery has little effect on their outcome. And those who don’t die still have a high trauma rate, which can ruin a day, or worse.
The bare minimum avalanche gear is an avalanche beacon, shovel, and probe. These three are often referred to as “the essential gear,” and they must be carried together; each is dependent on the other two. Airbag packs/vests are not replacements for them. In some circumstances airbags can help prevent burial, and there’s nothing wrong with stacking the odds in your favor by wearing one, but you and your partners still must carry avalanche beacons, shovels, and probes.
Avalanche beacons should have three antennae and be within the manufacturer’s recommended service life. Although no longer sold new, some two antennae models are still in use. These are functional, but not ideal. Although they can be made to perform almost as well as their three antennae counterparts, it takes much more practice. Check your avalanche beacon, and if it’s a two antennae model or beyond the manufacturer’s recommended service life, you should replace it. Note that there are other devices sometimes called "beacons," that are not avalanche beacons. "PLBs" or "emergency transponders" are for external communication, not companion rescue.
Avalanche beacons need to be worn on the body according to the manufacturer’s recommendation. If you don’t have an owner’s manual, you should be able to find this information online. Keep your beacon separate from any other electronic device, especially when performing a search with it. Don’t put a transmitting beacon onto a snowmobile or dog so that you can find these in case of burial. If you’re ever buried, your partners might recover the machine or dog before they find you.
Shovels should be made specifically for avalanche rescue, and made from metal, not plastic. Some packs and vests come with external carry systems, but these can snag on trees and can fail in an avalanche. Although there’s no excuse to have multiple people caught in an avalanche, it would be horrible to get caught and survive, unable to recover your partner because your shovel was ripped from your pack and lost.
Probes need to be long and strong, and carried inside your pack or vest like your shovel. Lightweight probes are often short and weak. Short probes may not reach a buried victim, and weak probes can break during rescue practice or while doing the real thing.
For motorized users, secondary shovels and probes can be carried on the machine for everyday use like digging out stucks and analyzing the snowpack. They will suffer more wear and tear than your rescue shovel and probe, which should be saved for emergencies.
Radios help prevent emergencies, and can be invaluable for communication if one has occurred. You and your partners should all carry radios capable of operating on FRS/GMRS channels (make sure you’re operating radios legally), and travel with them turned on and accessible, but separate from avalanche beacons. It’s helpful to wear speaker mics on the shoulder strap of your pack or vest. For motorized users, voice activated in-helmet options exist, but these may lead to unwanted noise and distracting chatter.
External communication like a satellite device, or cell phone if coverage is available, is vital for emergencies that require outside assistance. They can also help communicate with loved ones if your return will be delayed for any reason. Make sure your subscription is up-to-date and batteries are charged, and carry this on your person, not on your machine. If your external communication is powered up while you ride, keep it separate from your avalanche beacon.
Navigation tools like a map, compass, and GPS need to be carried. They have different strengths and weaknesses, so don’t carry just a map and compass, or just a GPS. Equally important is the knowledge to use them. Consider taking a navigation class if you’re not familiar with these skills.
Personal care gear includes weather-appropriate clothing, extra goggles and gloves, food and water, any necessary personal medications, and emergency overnight gear. A bivy sack, warm hat, headlamp, saw and a fire starting kit don’t take up much space, and while they may not keep you comfortable overnight, they can help keep you alive. The knowledge to build a snowcave or similar emergency shelter is as important as the gear you carry.
First aid kits can run the gamut from minimal to overkill. Many pre-packaged first aid kits are not much more than an expensive assortment of band-aids. Put some thought into what you carry, and customize it according to your level of training. Several kits distributed among partners can help improve the chances you’ll have what you need.
Repair kits can be somewhat equipment/machine specific, since everyone will have slightly different needs. You can learn what to prioritize in your field repair kit by using it for basic maintenance at home. Don’t forget a few universal items to be able to help a partner.
Rescue kits will vary depending on the mode of travel and the type of terrain. Skiers and snowboarders should carry a rope and rescue sled or “drag bag,” and know how to use them. Motorized users should carry a tow rope with ways to tie off to various machine types – both the tow vehicle and the one being towed. A kid’s roll-up sled or a game sled made for hunting can help to drag the broken machine, especially a snowbike that may have to be dragged on its side. In some terrain, rescue kits should include additional rope/webbing/carabiners/pulleys and the knowledge to rig systems that use them.


This website is owned and maintained by the non-profit arm of the Sierra Avalanche Center. Some of the content is updated by the USDA avalanche forecasters including the forecasts and some observational data. The USDA is not responsible for any advertising, fund-raising events/information, or sponsorship information, or other content not related to the forecasts and the data pertaining to the forecasts.